I don’t want to come across like an Apple fanboy, but there is a reason this tutorial is for Mac users, they simply got it right when developing OSX and its multiple variations. Since I began using Mac Computers, a little over 10 years ago, I transitioned all my computers, my companies’ computers, and even our clients away from PC’s as much as possible. It wasn’t only until about 5 years ago, that software developers realized they have to develop cross-platform, and that includes Windows-based, Apple OSX, and Linux variations for their software releases. Surprisingly, and much to my delight, it didn’t take long for this to really catch fire, and there are only a handful of programs that aren’t available on Macs, without setting up Bootcamp, or running standard PC software in emulator environments on a Mac. What that means is in ENGLISH, is boot camp is cumbersome and adds complexity, where the Mac, thanks to Steve Jobs’ OBSESSION with simplicity, is as simple as it gets in terms of User Experience, but doesn’t skimp on the capabilities for more advanced users. So here I am probably 12 years after by my first Mac
 So here I am probably 12 years after by my first Mac, and I’m still in love. I successfully phased out all but one PC, a Surface Pro 4 tablet/laptop hybrid running a full version of Windows, but it turns out I really don’t need it. I just use it for one business, which has compliance requirements, so it’s barebones. But the Mac is the mothership. My devices are all synced up, and then I have access to shared drives which syncs key information from our shared storage, which one “storage-server” is just a hard drive connected to a desktop and shared, with user priviledges assigned to each person on the team who accesses it. It’s simple. There’s minimal maintenance. But the hardware setup for small businesses is a topic for another day.
A Very Brief History Behind PDFs
Today we’re just going to go over what should be a simple task, editing a PDF. Why is it so difficult? It was created in the early 1990’s at a time when there were multiple companies competing aggressively to have their format become widely adopted. Adobe’s proprietary standard released in 1993, and proprietary meant you needed their special software to save and open it. It wasn’t until 2008 they made it an open standard, opening up the software to have other companies be able to create PDF files, convert Word Docs to PDFs, as well as edit existing PDFs. But editing, PDFs was never really intended to be full-scale editing. The PDF format was created as a standard format that was intended for publishing text and image based documents in a consistent manner, to international standards specifications (ISO designated such as ISO 32000). This allowed a Russian scientist to share his research report, which may have been created in a custom software, not even available in English, and export a report in PDF format, which could be read by American Scientists, Italian, French.. you get the point.
Since this format was intended for publishing, in other words, the FINAL DRAFT, it wasn’t intended to allow edits. Adobe Reader, software released by Adobe, was required up until recently to even open and view the PDF file and you were limited to making comments or “marking up” the document, so that it could be sent back to the creator and revised if they so desired. In 2008, when Adobe opened the format as an open standard things began to change. Microsoft Word allowed exporting documents directly to PDF within the Application, same with Apple Pages, Excel, even many computers allow you to save a webpage as a PDF from the print menu instead of printing it to an actual piece of paper. But one of the main benefits of saving in this format is that it could not be edited easily, if at all. If the PDF has proper metadata setup it extremely difficult for even an advanced user to spoof making the document appear that it was the original if they edit it. If you send a contract to a customer to sign, you don’t want them to have the ability to make a little change here and there, and sign it, then requiring you to reread it all over again just to ensure they didn’t change anything. That’s why we send important documents in PDF format, as they cannot be tampered with.
What Edits Can You Make
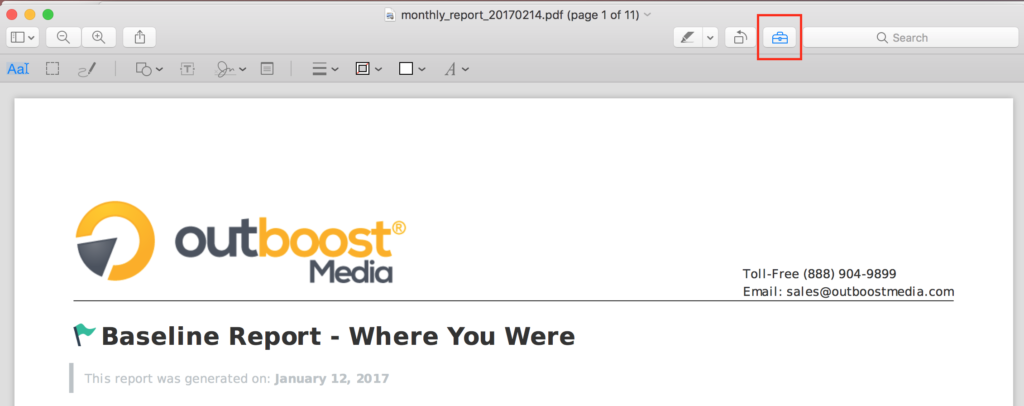
Assuming you have a real legitimate reason to make the edit, you do have a few tools available to you. Today we’ll focus on Apple Preview, the software that comes built in with all Apple Computers. You’ll notice at the top a few different icons, and you want to look for the toolbox, to make sure you have the Markup Tools showing and at your disposal. The toolbox is highlighted in red in the screenshot below.

By selecting the toolbox, a row appears below it with a variety of tools. They include a text tool, pen tool, shape tool, textbox tool, a handy signature tool (to have your signature digitally saved so that you can add it to documents later and avoid the whole print, sign, scan hassle!) plus a few others. Here you can add a date to the top of the post, or you could even add a logo and make some other changes. You’re not going to be able to edit the file like its a word processor, but if you get creative you can get alot done. For instance…
How To Edit A PDF File (Without Adobe Acrobat Pro, Photoshop or Expensive Software)
Let’s say I lost the original document. Or in this case, the report that my software generates doesn’t have the header I want on the document, we can get creative and in a few easy steps have a whole new document. Watch below how we totally changed the top of the report. You could actually design a new header in Photoshop or another image editor and copy/paste it in if you’d like. (If you’re having trouble seeing the animation below, watch it on Youtube – https://youtu.be/juz6ls7fmy8 ) ?

How To Combine PDFs Into One Document
Here is a quick walk thru on some of the ways you can use Apple Preview, which is included with all Mac Computers, and use it to combine multiple documents or select pages from one document and move and merge them into another. The best part of this technique is that it’s free! You don’t need to buy any special software, and you don’t need to learn any complicated steps or tools, its very simple. You can edit your PDF files with free software and save a lot of money that you would spend on expensive software that is very limited in its capabilities. And if you’re not getting the results you’re looking for, you can always contact us to do some quick graphic design work that’ll sharpen up your PDF and make it look spectacular, giving your business a strong presence, leaving a lasting impression. Presentation is key!
- First you’ll want to go to View > Thumbnails or click the left most icon on the top of the document and click Thumbnails. This will show you the pages of each document
- Do step 1 for the second document
- Locate the page you’d like from document 2, drag the thumbnail to the location you’d like in document 1
- Repeat if you need to add multiple pages
- Then save your work. If you hit save, you will save document 1, overwriting the original document, so you may want to Save As, and rename the filename something unique, if you still want or need both original documents, in addition to the combined version.
Here’s an animated walk-thru below. And if you cannot see it, check it out on YouTube – Best Free Software for Combining PDFs on Mac

So the next time you’re thinking about buying expensive software, or recreating an entire document, stop and think. Maybe you can save time and money by using this free software for editing PDF files. For most people this does what they need, and you can get creative and find ways to make it work even if it’s not the best free software for editing PDF files. And before you go spend $200 on overpriced software, contact us, and we’ll give you a quote on fixing your PDF design to get it the way you want for a fraction of that! It’s just one more way that OutBoost Media is helping small businesses utilize technology in a smart way to make their lives easier, their business more efficient, and their revenue more profitable!

